Video Help
Recording Video
Find a quiet place to record. (There are normal noises that will be unavoidable at times: toddlers, dogs, teenagers. But try not to run a dishwasher that sounds like a helicopter.)
Pre-recording a Lecture on the Computer Updated 3-26-2020
- Connect your iPad/Wacom tablet to your computer, or use your tablet computer with stylus.
- Open powerpoint/beamer slides or a notes app or whiteboard app (examples below)
- GoodNotes (iPad)
Pro tip: Use a black background in landscape mode and pastel colors for a chalk board feel - Notability (Mac)
- OneNote (Windows, Android)
- OpenBoard (Linux/Mac/Windows)
- GoodNotes (iPad)
- Open Application to Record Video:
- Quicktime (pre-installed on Mac), Download Here. Windows, try OBS.
- Set up screen recording (PDF)
Select portion of screen you wish to record.

Tip! If you want to insert a video of yourself:
Using Quicktime, select 'File -> New Movie Recording' from your web camera, and then select 'View -> Float on Top' to ensure the video window remains visible. - !!!IMPORTANT!!! DO A 1 MINUTE TEST RECORDING, TEST THAT AUDIO AND VIDEO ARE BOTH RECORDING!!! (Do this every time!)
- Press record
- End recording and save file.
- Recording Tips
- Consider pre-recording in smaller 5-10 minute chunks
- Use existing video from OCW or MITx if available
Pre-recording a Lecture directly from iPad or Android tablet Updated 3-26-2020
- Download the Explain Everything app. Designed for creating educational videos. Press record. Teach. End.
- 6 video tutorials
- Turn a presentation into a video (text and video tutorial)
- Digital collaboration (if you want to use in Zoom)
- Save file to Dropbox and upload.
- Post link to the class website!
Recording a Live Lecture from Zoom
- Create a test meeting and check that audio and video are recording
- Either push record when you start the meeting, OR schedule your class meeting to automatically record
- Share your screen. What you see on your screen will be what your students see, so you have a few options for displaying slides and/or notes. These include:
- Making slides (and annotating them with Wacom tablet, or through Explain Everything app on iPad or Android Tablet)
- Sharing your own notes/whiteboard app
- Using Zoom Whiteboard
Note: Linux users install `xcompmgr`, per this help document
- (Recommended) Ask a TA (or a new student from each class session) to help you manage the chat window/participant list for questions as you teach
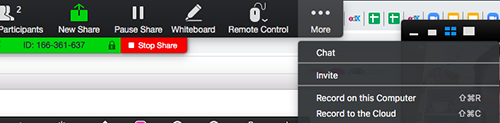
- While sharing a screen, to manage participants, mouse over the top of the screen (or bottom) and select manage participants next to the Stop Video button.
- While sharing a screen, to open the chat window, click the three dots that pop up as you mouse over the top of the screen, and select chat
- Note that you can use a third party chat like Piazza or Slack
- Before you end meeting, save a record of the chat, and stop the video
- End meeting
Uploading Video
OVS Updated 3-15-2021
- Everyone is getting an OVS collection to upload their videos to. Permissions to view videos are determined from Stellar website student and TA lists.
- You will save your videos to your MIT Dropbox and use a web form to upload into your OVS collection
Panopto for Pre-Recorded Video Added 3-15-2021
Panopto is a website that hosts videos for the MIT community. If you have pre-recorded lecture videos, or want to make some, you may wish to use Panopto.
Features
- Choose who can see each video. Options (in order of most private to least private):
- Specific users at MIT
- Everyone at MIT with the URL
- Everyone at MIT
- Everyone on the Web with link
- Combine multiple video streams. For example, you may have a video feed of a talking head, and a separate video feed of slides. Also possible to just have one video stream.
- Make edits to video streams.
- Add pop-up questions inside the video.
- Export standalone video files.
- Embed in a Canvas page.
Editing
Panopto can...
- Trim clips (e.g. only include video form 01:00 to 04:00)
- Splice clips (e.g. Play clip A, then clip B)
- Combine video streams (Play clip A and clip B at the same time, with audio from clip A)
But Panopto cannot... (as of January 2021)
- Add overlays (text, annotations, animations, etc.)
- Improve video quality (up the contrast, cropping, etc.)
- Change audio (add music, import separate microphone, etc.) These features require a more powerful editor.
Tips for getting started
- Open your Panopto home page.
- To upload a video to Panopto (or record a new one) click the "Create'' button from your Panopto homepage.
- Once the video is recorded, it will take some time to process.
- Once processed, Panopto defaults to "viewer'' mode. In order to edit a video, you need to open it in "editor" mode.
- Panopto has pretty good documentation, both as video tutorials and text:
- Trimming
- Splicing (different workflow from other video editors)
- Quizzes
- Sharing
- Downloading
- File structure
- Other features can often by found by googling "Panopto [feature]" e.g. "Panopto post to canvas"
Surprising Quirks of Panopto
Here are some surprising quirks that we found while learning Panopto.
- Panopto allows you to have two video streams, the "Primary" and "Secondary".
- Usually "Primary" is a talking-head and "Secondary" would be slides or a screen share.
- When you upload a video stream to Panopto, you have to decide if it is "Primary" or "Secondary". This setting can never be changed.
- It is possible to play Primary without Secondary (looks like a normal video). But it is not possible to have Secondary without Primary.
- Changes are not final until you click "apply."
- The video will start "processing." This takes time.
- It is not always clear when this step is completed, but navigating to the file from your Panopto home page will show the percentage remaining for processing.
- Audio/video cannot be separated.
- It is not easy to split a long video into small clips.
- To accomplish this, the only way (using just Panopto) is to upload n copies of the video, where n is the number of desired clips, and use the Clipping tool on each copy individually.
- You can save labor at record-time by stopping and restarting the recording after the footage for each clip is complete, though this is sometimes not feasible.
- There are other ways to do this using other tools (e.g. iMovie, FFMPEG, etc.), which each have their own learning curve.
Warning
It is common to think of Panopto as a video editor, but this is a mistake. The primary purpose of Panopto is to host and organize video files. Panopto's minimal editing capabilities are roughly comparable to those on YouTube, and YouTube is not considered a video editor. If it is helpful, it is apt to think of Panopto generally as a "local YouTube for MIT."
If you are not familiar with Panopto, it will take at least a dozen hours to feel comfortable with it. The interface is not particularly intuitive, but there is an internal logic to it that can become intuitive given enough practice. If you have the means to do so, it may be advisable to outsource some of the editing work to undergraduate TA's.
Further Resources
Save to Zoom Cloud (If recording from Zoom) Updated 3-23-2020
When setting up a recurring meeting, you can select a checkbox so that these meetings will automatically record to the Zoom Cloud. (If you press record from a meeting, it will automatically record to the cloud!)
- Pros:
- They will add captions to all videos.
- Data is protected and must have mit.zoom.us access in order to access video links.
- You don’t have to download, upload or do anything on your computer.
- You will receive an email when the video is done processing so you can share the link with students.
- Cons: It takes about 24 hours to process a 1 hour video.
(Discouraged) Upload to YouTube
- Create your own YouTube Channel.
- You must choose to upload “unlisted”
- Private videos cannot be viewed by anyone other than you.
- Public videos must have human edited closed captions; the automated YouTube captions are not consistently accurate enough to be ADA compliant.
- Still a little risky as “unlisted”, but OK! (It is unsearchable, but still shareable outside of MIT.)
Legal Considerations
- Posting videos
- Copyright concerns: OK under Fair Use
- Private site (OVS Collection) is OK
- Unlisted on YouTube: if students are in recording (video and/or audio) you MUST get students to sign a media release form (and it is good practice, even if you aren't planning on using YouTube)
- Remember you can have students not show voice/audio
- Most classes will not violate FERPA but check the FERPA website to be sure.
- EX1: student identifying a medical condition
- EX2: student releasing information from confidential or private government records on the video
- It is good practice to tell students NOT to mention that type of information
- The new disability rules require us to transcribe any publicly posted videos. If you upload to YouTube they will be transcribed automatically. However, these transcripts are not ADA compliant.
- If you’d like more information about disability services, you can check out more details On the Student Life Website.
Editing Video Added 1-12-2021
Editing video is a time consuming process that is computer intensive. Fortunately, there is a way to edit video on the cloud using Panopto! This saves time and computer resources.